Friday, May 29, 2015

DIY Orb Chandelier

Y'all, this may be the best DIY to date!
The Orb Chandelier!
Not only does it look great, the time and money I spent was so minimal! 
I had admired similiar chandeliers in catalogs.
                             For something about the same size at Ballard Designs would cost $399!
I found my metal Orb at Target in the garden section. 
The large was $39.00 and the small was $29.99, 
but I just happened to grab it when it was on sale! Score for me!
This is what we had hanging in the foyer and hallway of our house. 
I'm sure it was installed by the builder back in the 80's and it was time for it to go!
I took the chandelier down (after I turned off the power!) and took it all apart. 
The only thing I didn't keep was the glass surrounding the lights.
I cover the electrical part of the light to protect it from the overspray of paint and set it aside while I worked on drilling a hole in the metal garden orb.
I used these glass and tile drill bits that I already owned.
 I started out with the smallest bit. Slow and Steady.
Then I pulled out the biggest bit I owned to create a large hole. 
I needed something that would allow me to fit parts of the previous light fixture through the hole.
This next part is a little hard for me to explain, so I tried to take pictures along the way. 
Basically I put the whole light fixture back together (minus the glass casing).
Here comes the fun part, spray painting the whole thing.
Do you like my special "technique" of hanging it in the tree?!
I sprayed it several times, 30-45 minutes in between each coat.
I used Rusteoum Oil Rubbed Bronze.
I brought it back inside. Connected all the electric wires, added the light bulbs and then some crystals.
You could order some crystals (3 of them) for $35 OR you could buy them at Hobby Lobby
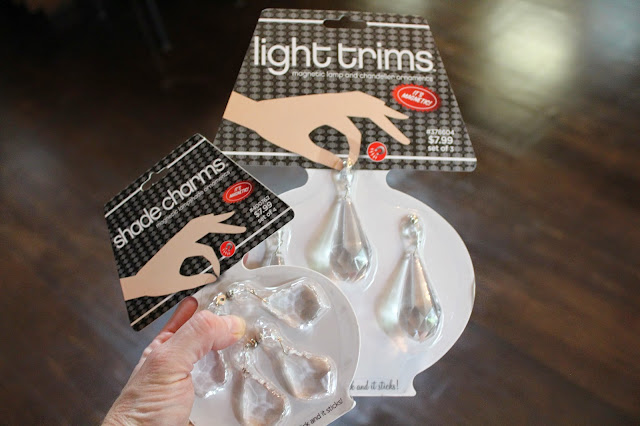
(and use a coupon) and get double the amount for less money!
I just love this extra touch these crystals add!
I love the way it turned out. It's totally chic. 
Way better then what we had before. 
It really was an easy project with a great impact.
I have a large one in my foyer and a smaller one in the upstairs hallway. 
It's got to be one of my favorite things I've ever upcycled!

Friday, May 22, 2015

Distressed Stacked Frames with Burlap Bow

Some good friends got married recently and I needed a unique and special gift just for them.
My go-to colors these days are grey, white and black. Burlap is my favorite accessory!
I found this vintage white burlap wired ribbon at Michaels along with these two wood frames
 (one 5 x 7 the other 8 x 10). They were perfect for my project.
I painted the larger 8 x 10 one gray and the smaller 5 x7 one white.
I distressed each of them lightly to give a worn and vintage look.
Using some regular old wood glue I attached the two frames together.
I used the glass from the 5 x 7 frame and the backing from the 8 x 10 frame.
I added some vinyl lettering (cut out from my Silhouette) and...
I love the way it turned out.
I hope they love it too!
Check out this post for another spin on the stacked wood frames

Friday, May 15, 2015

Vintage Inspired Fabric Banner

It's that time of the year to celebrate. 
And what better way to do that then with a cute Vintage Inspired Fabric Banner. 
 It's really easy to do and I'm going to show you how!
I found these great fabrics at Hobby Lobby. I bought 1/4 of a yard of each.
 I used a heavy piece of cardstock to create a template.
Using a ruler I measured out how large I wanted each pennant on the banner to be.
It's roughly 4" wide and 6.5" wide (when folded).
 It's helpful to have this pattern-I'm sure I will use it again!
For the template a heavy cardstock is a good idea, but not necessary.
After folding the fabric I layed the template down...
I traced around my template with this "special" disappearing ink marker (sold at fabric stores) 
although a pencil will work fine too...
After a couple minutes my purple line will disappear!
 I cut out each of my pennants. 
I was able to get 4 (folded) pennants out of each piece of fabric.
With a hot iron, I pressed each pennant to get it nice and smooth and ready for sewing.
I already had this vintage looking yellow and white bakers twine, 
but just about anything would look good (rick-rack, yarn, thin rope, gross-grain ribbon...)
I layed part of the twine under the folded part of my pennant...
And then sewed over the twine and very close to the edges, all the way around the pennant.
However, I did not think it's necessary to sew along the top. I measured 2" in between each pennant and continued to sew them all on the same piece of twine until I had used all my fabric pieces.
You can see that the edges are a little frayed. And I like them that way. 
It adds to the charm and character-the vintage look I was going for.
I love the way it turned out!
And I think it will be great for lots of occassions!
Check out some of the other banner's I've made, 
Birthday Banner at the Mustashe Party
Burlap Banner at the Vintage Circus Party
Fabric Banner at the Rainbow Party

Simple Spring Wreath

If you've got 7 minutes and a couple bucks, you too can make this Simple Spring Wreath! You'll just need a couple supplies fr...