Monday, January 31, 2011

Shabby Chic Shelf

I'm back at it. Wood-working is SO much fun!
 I LOVE LOVE LOVE how this latest project turned out.
 This shelf was a headboard in it's former life.
It had been in our basement for years and one day it fell over and broke.
I cut off the ends. Added some brackets, a piece of wood for the top and some trim on the sides. 
 I then painted the whole thing white and distressed it a little.
I found some old knobs to complete the look.
My Shabby Chic shelf.

Thursday, January 27, 2011

Red Burlap Wreath

I love the look of burlap and had bought a couple yards of red burlap to decorate with at Christmas. I had some left over and decided to put together this wreath for Valentine's Day. 
My inspiration came from WhipperBerry.

I decided to add a black frame so the reds wouldn't blend so much.
 I found an old 11 x 14 frame, yes, in my basement. 
It was a little beat up, so I spray painted it glossy black. 

Here's how I did it. You'll need the following supplies:
  • about a yard of burlap (any color will do)
  • hot glue gun (with lots of extra glue)
  • scissors
  • styrofoam wreath (any shape you desire)
I just happened to find this red glittered heart shaped wreath at Hobby Lobby. If your wreath isn't the same color as the burlap you are using, you might consider spray painting it so everything blends nicely. 

 Cut the burlap into 5 x 5 squares.
 Fold the square in half.
 And then fold it in half again.
Then round around the three corners.
Cut the corner off. And add a pretty decent amount of glue and stick it to the wreath. 
 Continue to do the same thing around the whole wreath.
 It will start to look like this.
The completed wreath!
Thanks for visiting!

Monday, January 24, 2011

Subway Art

You've gotta love these cute Valetine Subway Art
created by the girls at Eighteen25 
Hop on over to their blog and you can 
download and print one for yourself.

Thursday, January 20, 2011

Little Things

I facilitated a women's Bible study at my church this fall. Every Tuesday morning I would meet up with a wonderful group of ladies to study God's word under the leadership of author and speaker Beth Moore.

One of my love languages is gift giving and I loved creating little things 
for the women in my Bible Study. 

On our first day I passed out little note cards with mini "embellished" binder clips
 The notecards were to encourage scripture memorization.

The next week I brought a little square of chocolate 
(Russell Stover & Ghirardelli) made by folding a two-sided 6x6 square of paper.
Chocolate is a great way to start your day!

In order to keep your place in your book, I made bookmarks from ribbons & charms. Believe it or not, most of the supplies for these crafts I found in my basement. I know, you want to come to my basement and go shopping!
 These are really simple to make. Cut your ribbon double the length of your book. Thread the charm so it reaches the middle of your ribbon. Tie a knot and then tie another knot at the top. 

It was easy to put together a sweet treat of candy corn, peanuts and M&M's in a little candy baggie tied with a festive fall ribbon.
Just a little reminder of how Sweet He is to us!

In order to have your memory first posted to the front of your fridge,
I made magnetic memo clips from clothes pins. 
Tutorial here.

 For this next gift I tied twine around a candle and hot glued two acorns to paper hand made acorns along with the verse of the week. For instructions on the hand made acorns, go here.
The dollar store has become my new favorite place when buying "multiples"

I always wanted to try Truffles... so while watching the TODAY show Katie Brown was on demonstrating how easy it was to make truffles. So I did!  Go here for her recipe

 Finally, on our last day of class we had a Christmas brunch... 
so I crafted up my last gift of the year,  Christmas Shopping List's.
 In a variety of festive papers and ribbons.

 I love the idea of keeping this in my purse to jot down
ideas that I have for people, grocery lists and things to get at Hobby Lobby!
I have different little embellishments on each of the covers.
I'll have to get the cutting dimensions for you (basically just make a folder). But the main thing you'll need is to get small legal pads cut in half (they can do this for you at your office supply store
-I got mine at Office Depot).
I use a little bit of scrap paper for the top of the legal pad 
and then glue dots to keep the whole thing in place. 
Tie it all up with a ribbon, again using glue dots. 
How cute is that? 
They'd be great for keeping tallies during card games or little gifts for teachers anytime of the year.

I hope the ladies in my Bible study don't have high expectations...
there are some 20+ women in my class this year!

Sunday, January 2, 2011

Dress-Up Girlies

For Christmas is was time to expand our woodworking horizons to our nieces who like to dress-up. My sister-in-law was hoping to find something to house all the tutu's & boa's and I offered to make something for them for Christmas. I was unable to find actual building plans, but my amazing husband figured out, based on a picture, how we could do it. 

After a couple of sleepless nights thinking about all the things I had to craft up BEFORE Christmas, Ben offered to go and get the wood and then just starting putting it together! Isn't it amazing?!
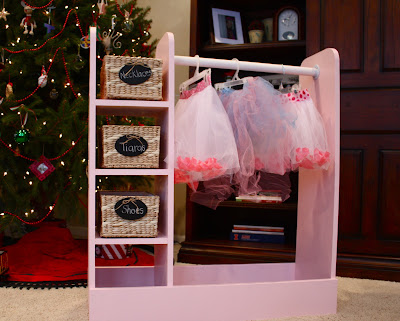
I just added the finishing touches.  I bought wood cutouts at Hobby Lobby and painted them with chalkboard paint, drilled two holes in the top and added twine to attach them to the baskets.
While driving home one day I came up with the perfect finishing touch, a great verse that all little (and big) girls need to know:
Three round mirrors on the opposite side.
Christmas morning:
 Happy dress-up days girlies! Love your Aunt Chessa & Uncle Ben


Simple Spring Wreath

If you've got 7 minutes and a couple bucks, you too can make this Simple Spring Wreath! You'll just need a couple supplies fr...