Friday, March 30, 2012

Friendship Bracelet Kit

My soon-to-be 12-year-old daughter spent a lot of time last summer making friendship bracelets. So when I saw this adorable Friendship Bracelet kit on Eighteen25, I knew I had to make her one!
I started out with the following supplies:
A craft organizer (Hobby Lobby for $1.99).
 A pack of embroidery floss. I found this one at Hobby Lobby for $16.99-check out all the great colors!
(I used a 40% off coupon-of course!) This one came with flat white plastic floss bobbins.
 Using some cute scrapbook paper, a small 6 x 9 clipboard, 
some ribbon and my laminator.  I embellished the clipboard
 for holding the string together while making the bracelet. 
For the details on the how to, head over to Eighteen25 and download the tag there.
 After I used up all the white plastic bobbins that came with the floss, 
I headed out to Hobby Lobby to get more and found these adorable printed ones! 
 $1.99 for 50! I love the color contrasting.
 This took some time, wrapping the floss around the bobbins. 
But it looks so pretty in the box and will help Sid when she makes her friendship bracelets.
 I added a thread cutter to the box. No need for scissors (and now it's friendly for an airplane ride!)
 With a large elastic or headband, in my case the clipboard and plastic organizer are secure together...
 Time to get busy!
I'm sure you have someone in your life that will like this just as much as Sidney will!
Friendship bracelet tutorials:


Thursday, March 22, 2012

Easter Subway Art

In the midst of all the colorful eggs, bunnies and jellybeans 
I created a Subway art to reflect what Easter means to me.
I created these Subway Art prints for you to download for FREE. 
Click on the link to download them to your computer 
and then upload to your favorite photo processing store. 
These prints are designed to be a 16 x 20 photo print or 8 x 10 photo print. 
I print mine at Costco (tip for printing;  use the cropping tool to make sure your print is centered. 
Before completing your order, click the box "do not autocorrect my print")
For the spring colors print, download here
For the jelly bean colors, download here

For the earth tone colors, download here

 I've redecorated since last year and printed a new Easter Subway Art for my family Room.
 Thank you for all of you who stopped by last year and have my Easter Subway Art in your home! 
And to those who have found me through Pinterest because of the Easter Subway Art! Thank you!
 (check me out on Pinterest here!)

Wednesday, March 14, 2012

Chalk Board Labeled Bottles

I wanted to share with you this fun idea for personalizing drinking bottles. 
Or the case of the picture below, vases!
Here's how you can make your own. I bought a pack of mocha latte's...
 And peeled off the label around the bottle...
 Emptied out the contents and then washed and dried it. I choose to discard the lid.
 I used a little bit of Goo-Gone to get rid of the stamped expiration date that was on the glass 
(I couldn't get a good picture to show you). I found one on the side and one on the bottom of the bottle. 
It came off nice and clean with the Goo-Gone.
 Using my Silhouette and some chalk board vinyl I cut out oval labels 
(I bet you could use chalkboard paint instead of the vinyl).
I bought some of these fun striped straws from Pick Your Plum. So cute!
It sure does making drinking your milk a whole lot more fun!

Thursday, March 8, 2012

Applique Tote Bag

I've shared other applique projects with you in the past, so here I am once again.
 I need to express how easy this is! And I want to encourage you to try it! 
I found this cute bag at Hobby Lobby (they have other styles and colors too).
I picked up 3/8th yard of coordinating duck fabric (also Hobby Lobby).
I traced around a chipboard letter (backwards)...
and before cutting it out I ironed on the applique adhesive 
(like Heat n' Bond-found at Wal-mart, Hobby Lobby, JoAnn's). Then I cut my letter out.
I grabbed this lid and traced around it for my circle. Ironed on the applique adhesive. 
Then cut the circle out.
First I ironed the circle on and then the K on top of it.
I used a zig-zag stitch in contrasting thread (teal in this case) and sewed around the edge of the circle. Then using a straight stitch (with black tread this time) I sewed around the K.
I filled the bag with new markers, drawing paper, fun paper clips and binder clips, a pad of small scrapbook paper,  a clipboard and tape (this girl loves using tape!)
We were away from home the weekend of Katelyn's birthday, 
so we had our own little celebration in our hotel room.
She really does love her new bag! She's been carrying it everywhere, so that makes me pretty happy!

Saturday, March 3, 2012

The Rainbow Party

It's hard for me to believe that my baby girl is growing up. A couple months ago when we started planning her party she suggested a Rainbow party, and then changed her mind and wanted a Justin Beiber party. What? No, back to the rainbow idea. 
And then I went crazy pinning ideas all over the place. Here are some highlights from the day.
We hand delivered her invitations. Found these great lollipops at Family Dollar.
She greeted her guests with gumball bracelets. More on that here.
I had so much fun decorating and grabbing some rainbow colored things at the last minute. 
I love the way this balloon arch turned out! It really was pretty easy. I bought one pack of each color of the rainbow (red, orange, yellow, green, blue and purple) at Wal-mart. 
I followed this great tutorial at Design Mom, go here for the details. 
One of my favorite blog's is Eighteen25. They have great ideas, fun giveaways and free print-ables. They were actually the ones who inspired me to create my own Subway Art. Check their's out here. The birthday Subway Art was personalized just for the Rainbow party. Thanks again Eighteen25 girls!
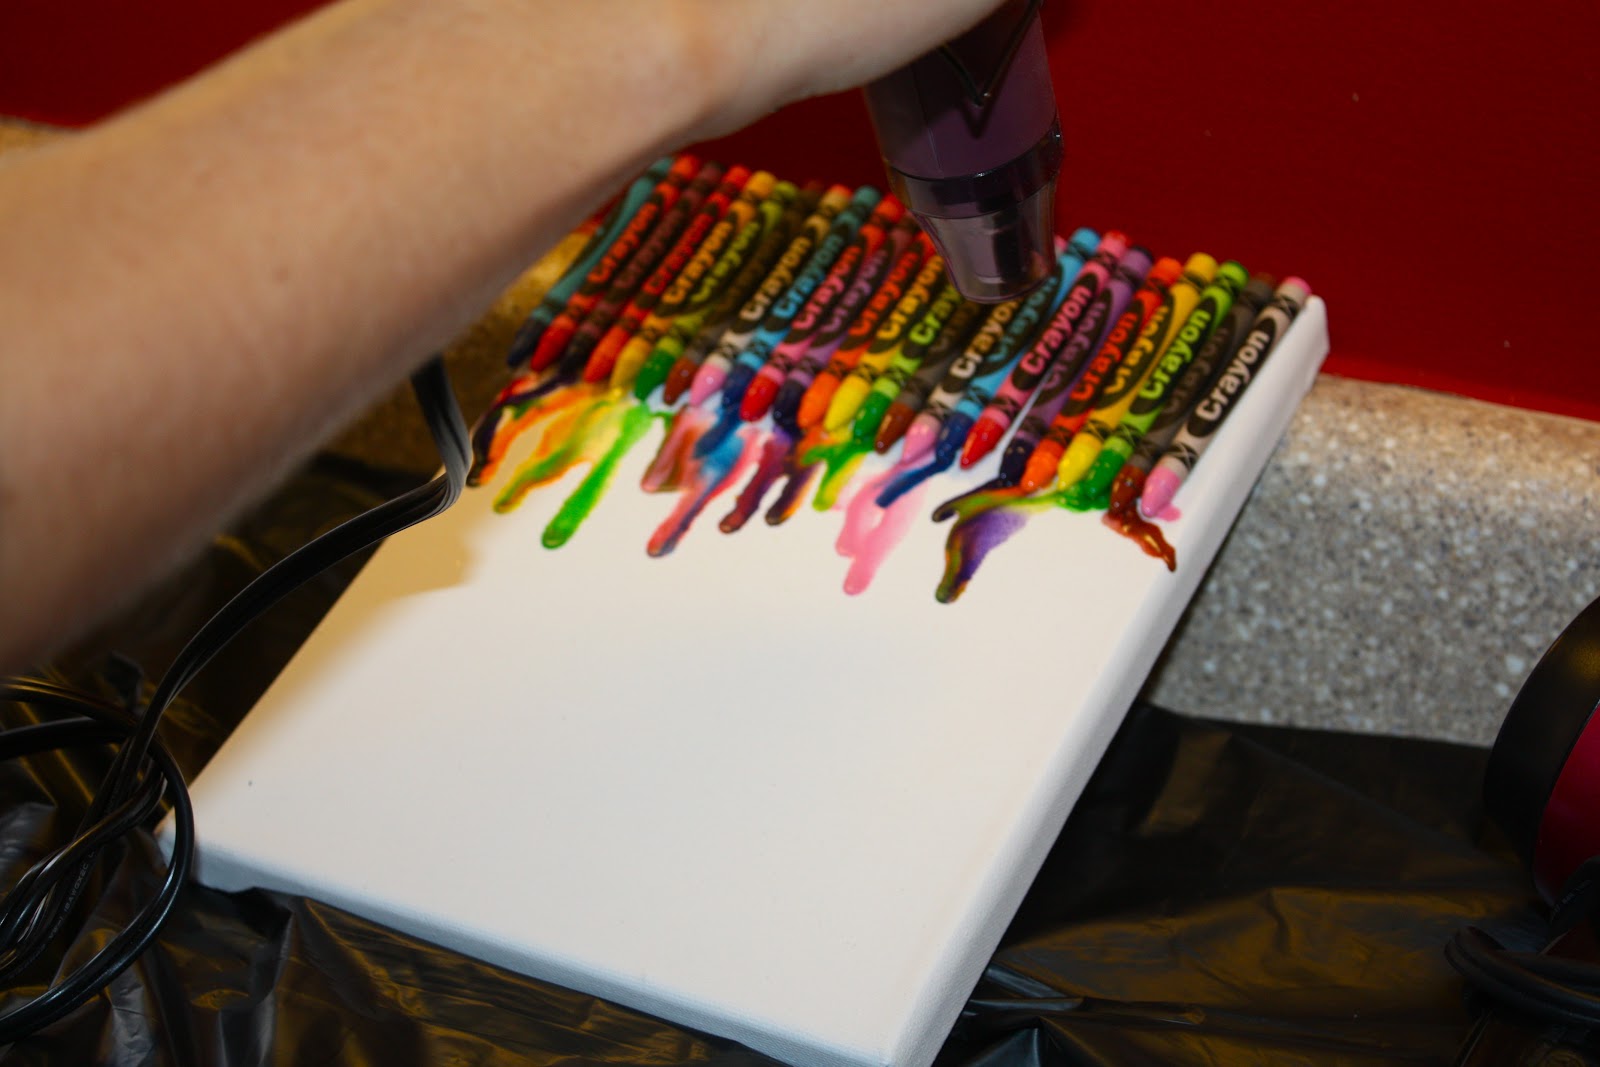
Something that I've seen all over Pinterest are these fun Crayon Art.
Each of the girls designed got the chance to design. This so was so easy and so fun. 
Each girl layed out their crayons in a pattern and we helped them hot glue them onto the 8 x 10 canvas.
Using my heat gun (or a hair dryer) we melted the crayons and they slowly dripped down the canvas. A couple of tips, don't hold the heat gun too close to the crayons because the wax will start to splatter.
 Also, it's a good idea to tip the canvas slighty so the wax doesn't rush down the canvas.


These cute little bottles were such a fun addition to all my party supplies (and can be used again and again!) I bought latte's, emptied out the bottles (via my good friends Kate & Shane!) I took the labels off and added oval chalkboard vinyl. I bought the straw off Pick Your Plum (love the deals there!)
This rainbow jello was fun to make (tasted yummy too), even if it took me ALL day. 
Great direcitons here at the Funky Polkadot Giraffe.
Rainbow fruit and cheese with mini Ritz rounds as the pot of gold. 
Rainbow cake and rainbow cupcakes! For the cake I used two mixes and divided the dough into 6th, coloring each one with Wilton's Icing Color Set 
I made this pennant with different printed colored fabric.  
I cut out removable letters that spelled K A T E   I S    E I G H T 

I used my Silhouette to create this 
personalize vinyl label for the their candy buckets (buckets were $1.00 at Target)
 The girls each filled up their buckets with candy from the rainbow. 
Red Michigan Cherries (a family favorite!) Yellow Banana Runts, Orange Slices, Green Gummies (fish, dinosaurs, worms and bears, Blue M&M's and Purple Mike & Ike's. 
Most candy was purchased from Old Time Candy (I highly recommend them - they had everything I needed and I received my candy within a couple days of my order!)
In case you were wondering, the Rainbow tastes yummy!
Everyone enjoyed the little candy bar.
Happy Birthday again to my sweet baby girl!

Simple Spring Wreath

If you've got 7 minutes and a couple bucks, you too can make this Simple Spring Wreath! You'll just need a couple supplies fr...