Friday, December 23, 2011

Merry Christmas from my home to yours!

I love Christmas and I love decorating my home. 
I thought I'd give you just a glimpse of how things look at my house this year.
Here's how it looks as you enter through the front door. Lighted garland with red burlap ties.
 I just had to add something festive to the mirror over the fireplace... and I loved the way it turned out!
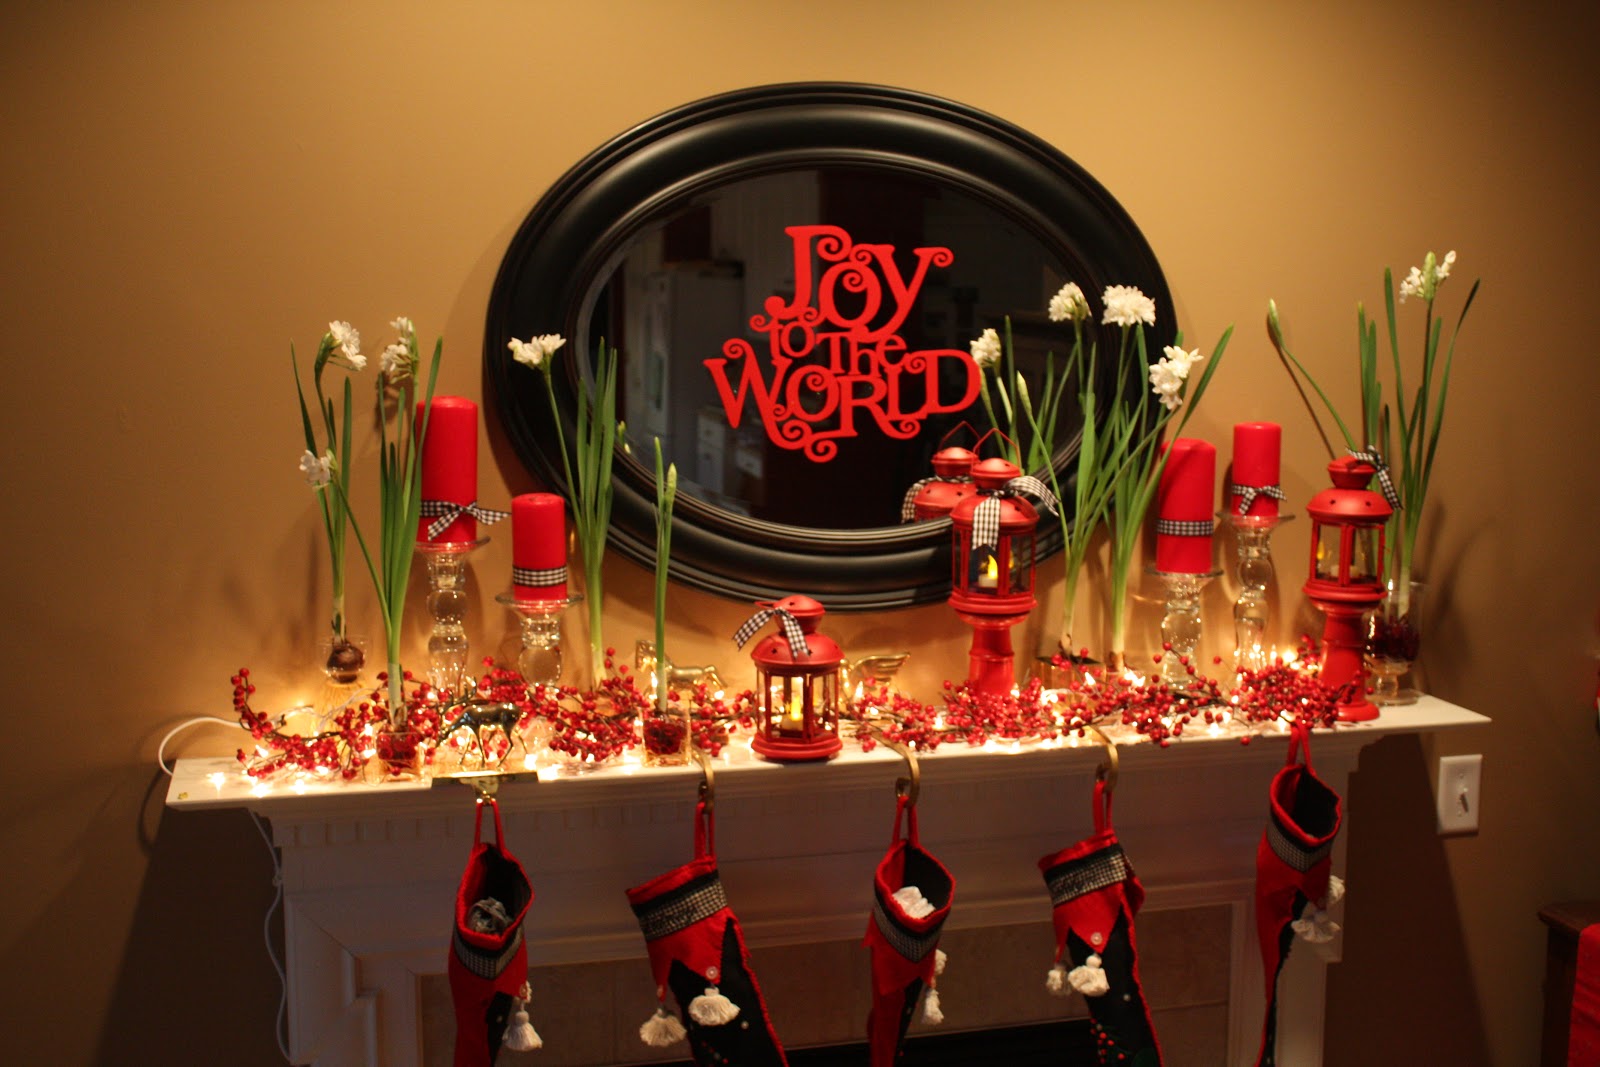
Red berries, red candles, red lanterns (from IKEA), white lights 
and paper-whites (I put the bulbs in water right before Thanksgiving
 and they've bloomed just in time for us to enjoy them before heading home for Christmas!)
Decorating the tree... The snowman ornament was something I crafted up many years ago. 
It's just an old light bulb with salt and white paint.

Ben collected the 12 days of Christmas Crystal ornaments by Waterford,
displayed on a gold-leafed tree in our family room.
A Pinterest creation; Mary, Joseph and Baby Jesus.
Our Little People nativity nows resides on the bookshelf (Little People taste really good to dogs!).
The wreaths on my windows change slightly from year to year...we have red theme going
so Poinsettias were the natural choice.
We use our Christmas plates all season, but I dressed up the table a bit 
when we had an "Elf Party" one night. Complete with Elf trivia and the move "Elf" with Will Ferrell (one of our favorites!).  Katelyn decorating the tree (in her snowman fleece PJ's - all the kids have them!) 
Sidney writing the Christmas letter. 
And my It's a Wonderful Life village 
(you can see Mary hiding in the hydrangea bush while George holds her robe)
My nativity resides in the dining room this year (it's just too tempting for the pooch).
My grandmother made these prints and once had them hanging in her own home. 
Thanks for stopping by!
Merry Christmas to you and yours!

Tuesday, December 20, 2011

Gift Giving

The "workshop"has been consuming most of my time lately getting gifts ready
 for family, friends and teachers.
 The last of them we finished up this morning!
 Sidney insisted she needed gifts for her friends, 
so we created theses little necklaces with their names stamped into clay. 
I used a silver paint pen to highlight the letters. 
 Teacher's gifts; lotion from Bath & Body Works, Homemade Strawberry Sauce and Infinity Scarfs!
I love these cute little "For my DEER Teacher" tags.
The little reindeer can be found at the Silhouette store. So cute!
 
These little clear paint cans were found in the $1.00 spot at Target. Perfect for the Infinity Scarfs!
 This Fort Kit is for my 3-year old niece (I hope she doesn't read my blog before Christmas!) 
The Kit includes: clips, rope, crayons, notebook and flashlight.
The bag actually came with a set of twin sheets from Target - I love being able to repurpose things! 
I cut the letters out, ironed them onto the bag and used black fabric paint for definition.
I've also been working on several other gifts (that I can't post until after 12/25!) 
and some festive projects for the home (and that is for another post entirely!). 
But I had to share with you this picture I found on my camera... so sweet that girl!

Thursday, December 15, 2011

Joyeux Noel & God Jul

Lately I've been inspired by... Well everything on Pinterest! 
With a little trip to IKEA, some red flocked iron-on vinyl and 
my Silhouette - I came up with my very own Christmas pillows!


 "God Jul" is Merry Christmas in Swedish.
"Joyeux Noel" is Merry Christmas in French.

Monday, December 12, 2011

A walk down Candy Cane Lane

This weekend my friend and I had the fun of hosting a table at our church's Women's Christmas Brunch.
Kate and I spent a couple days crafting up the starlight mint trees and balls. 
We simply hot glued the mints to the styrofoam tree (keeping the plastic wrap on).
 We glued three tiny candy candy together to create this adorable place card holder.
We used the same tiny candy canes to create our heart napkin ring holder. 
The majority of our time was spent etching these clear glass plates we found at IKEA.
We etched four plates in all, LOVE, JOY, PEACE and HOPE 
(I guess I forgot to take a picture of PEACE-but you get the idea!)
 Each of the ladies at our table took home a plate and....
 Homemade Peppermint Bark!
Kate spray-painted a couple wine bottles white and then covered them in glitter. So easy! So fun!
We found the red & white stripe table runner and napkins at Hobby Lobby, 
the greatest craft store on earth. You'll find me there at least once a week!
Here's a look at some of the other beautiful tables from the brunch.


Friday, December 9, 2011

Christmas Ornaments

Here's what I've been up to lately, crafting up ornaments for our freshly cut tree.
I started out with some basic supplies. Glass balls for these:
I used my Silhouette to cut out vinyl letters (you could use stickers as well) 
and wired ribbon glue to the top.
 I made each of the kids an ornament with their picture behind a plastic star. 
Here's how I did it:
 I used a package of Scrapbook Adhesive Sheets (found at Archivers) 
and clear plastic stars (sold in a set - also found these at Archivers).
 Applied the sticky to one side of the star...
 Put it over the top of the picture.
 And then cut around it with my xacto knife (by the way - one of my favorite tools!)
 Traced the star on some black card-stock and cut it out.
 Added a satin red ribbon...
 and the black-card stock star to the back.

I made this block ornament for a friend.
(About a month ago our families went down town for a Christmas photo shoot).
  These are pictures of their family from that event. 
I'm going to make one for our family as well. 
Here's how I did it:
 Found this package of wood blocks at JoAnn's. I painted them black.
Cut out twelve 1x 1" pictures. (4 pictures per block) 
Drilled a hole into each block
Using my Xyron sticker maker, I loaded my 1x1" pictures in and turned them into little stickers 
(you can use Mod Podge for this step - you're going to need it anyway!)
Put a thin later of matte finish Mod Podge over the top of each picture.
 Using a needle and some of your favorite ribbon, string or yarn, thread it through the three drilled holes.
(I changed ribbon after I took this picture and ended up using 1" black sheer ribbon)
I tied a knot at the top and bottom of the block so they wouldn't move around so much.
And added a bow to the top.

Simple Spring Wreath

If you've got 7 minutes and a couple bucks, you too can make this Simple Spring Wreath! You'll just need a couple supplies fr...